Starting Fresh

Hi Everyone,

Now I know it’s been a long time since I last posted on this blog. And trust me, it won’t happen again. With the new year I’m going to start posting more often throughout the year. Whether that’s every week or month I’m not sure, but it definitely won’t be every year.

This blog won’t be exactly the same as it was two years ago, after reading other blogs and learning more about blogging and coding, I’ve decided that I don’t want to have “set” lessons. I’ll still write posts to teach people certain things, but I may also start writing reviews of products, websites, books or software I’ve used to help develop my knowledge in computer science.

This year holds many exciting opportunities for me and I want to start it by getting this blog up and running again. If you have anything that you want me to blog about please comment!

Thanks for all your support,

Georgia.

CSS Lesson 3: Adding a Header

Hi Everyone!

In our last CSS lesson we learnt how to add background colors and containers. Today we will be learning how to make a header. To make a header (similar to containers) we need to link our CSS code back to our HTML code. For this we will need two files, an ‘index.html’ file and a ‘stylesheet.css’.

Firstly let’s write our CSS code. Using CSS we can customize our header like so.

h1 {
font-family: Courier;
font-size: 20px;
color: blue;
}

Next we’ll write our HTML code. Through this code we’ll link our two files together and we’ll also write what we want our header to display.

<link href”stylesheet.css” rel=“stylesheet” type=“text/css”>
<h1>Yay! You made a heading.</h1>

That’s it! If you have any questions about this code feel free to leave a comment below. Happy coding! 🙂

My Project Results!

Hi Everyone,

I know I haven’t posted in a while, but, let’s just forget about that … ≧◡≦

Anyways, near the end of my third school term in September everyone in Year 8 had to present their Personal Projects to the School and Families. There were certain things we had to have on our presentations such as our goal, our purpose, our essay and so on. I decided to go with a simple presentation board and a laptop displaying my blog and presentation video.

This was my final product

georgia s

But of course the results, our projects were marked with a grade ranging from 1-7 (7 being the highest) and a score out of 28.

My project received a grade of 7 and 28/28! I am really happy with my results and can’t thank all of you enough for supporting me throughout this project.

However, the pondering question, will I still be posting on this blog? The answer is yes! Although I won’t be posting as often as I would like next year due to starting High School.

Once again, thank you all so much for your support, this project wouldn’t have been possible without you!

My Personal Project Journey

Hi Everyone,

Recently I’ve been preparing my presentation for my project to present at my school. Although I wanted to do something different, when I found VideoScribe I knew that it was exactly what I needed.

Here is a video I created using VideoScribe to show the highlights of my personal project journey.


CSS Lesson 2: Background Colour and Containers

Hi Everyone,

As you may have noticed my previous post about CSS was written on an HTML document. Although today we will be using a CSS document!

Today we will be learning how to change the background colour and create containers in a CSS document.  When creating containers we will need to also need to create some code in an HTML document.

Let’s start off with some simple code to change our background colour.

body {
background-color:#FF9999
}     

Now  let’s get started on our containers. Containers can be used for organising your web page into different sections, or just for show.

body {
background-color:#FF9999
}     

.container {
width:860px;
min-height:400px; 
background-color:white;
margin:0 auto;
padding:20px;
}

Now we need to write some code into an HTML document so that the container will actually show up on our web page.

<body>

<div class="container"> 
</div>

</body>

Next time we will work on creating a header in our code.

TextWrangler!

Anyone who has used HTML and/or CSS knows that decent software goes a long way. Especially if you’re using it 24/7!

I was introduced to TextWrangler yesterday whilst coding in class. TextWrangler can be used not only for writing documents but also is a great tool for writing HTML and CSS. As TextWrangler is available for a free download I think it is a great piece of software to use if you’re are just starting to use HTML and CSS.

Some of the benefits include being able to have multiple documents open at a time. This obviously makes it easier for when you’re needing to switch between documents constantly. TextWrangler also automatically colour codes your tags making it easier to read your code.


TextWrangler can open files off a web server using FTP (File Transfer Protocol), a commonly used method of transferring files across the internet. Making this a great tool for people editing websites. 


Screen Shot 2014-08-19 at 3.06.38 pm

If you would like to download TextWrangler for free click here.


CSS Lesson 1: Basic CSS

Hi Everyone,

Previously we have been working with HTML, which is basically used for creating the content on your website. But, we haven’t yet talked about CSS. CSS stands for Cascading Styles Sheets, in other words you can use CSS to  your website!

If you would like some more information about how CSS works click here. 

Here is an example of how to use CSS through a HTML document to change your background colour.

<!DOCTYPE >
<html>
<head>
<style>
body { 
       background-color: yellow;
}
</style>
</head>


Tinkercad

Hi Everyone,

Sorry for not posting in a while! I’ve been really busy…

Anyways, recently at my School we have been looking at a program called Tinkercad. With this program you can design anything in your wildest dreams! But, the main thing you can use it for is 3D PRINTING and MINECRAFT! For example, you could design a solid cube on Tinkercad, download the suitable file (STL) and then print it from your 3D printer. Or you could design a house/building/structure, download the suitable file and then print it from your 3D printer.

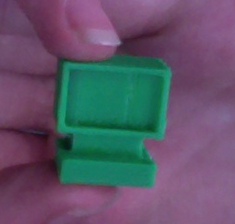
At School we were asked to create a design on Tinkercad that was simple and that represented you. For this I chose to design a computer. This design is simple and easy to make (as long as you know your way around the program).


Below you will find my final designs before I printed it through my School’s 3D printer.

Screen Shot 2014-06-20 at 3.21.40 pm               Screen Shot 2014-06-20 at 3.21.58 pm


This was the final product.

Screen Shot 2014-07-17 at 2.52.18 pm

If you would like to create your own project like this you can create a free acount here on Tinkercad. You can also follow the official Tinkercad Twitter acount here.

How Much Do You Use the Internet per Day?

I personally use the internet on average about 3-6 hours per week day. Although most of my internet usage is at school, as our learning is based largely around technology.

New research had proved that the average person spends 23 hours a week online. Doing things such as emailing, messaging, using social media and other online communications. Results from my survey have showed that 48% of respondents use the internet 2-4 hours a day. Although only 8% of my respondents use the internet for less than 1 hour a day.

Screen Shot 2014-06-16 at 6.48.57 pm

What Device Do You Access the Internet With?

Personally, I use my MacBook Pro to access internet throughout the day at School and home. I don’t often use a PC because I am required to use a MacBook Pro at School and my MacBook Pro does everything I need it to. I also use my 5th Generation iPod Touch to access the internet, although I mainly use it for music, games, mail, social media and YouTube.

According to Wikipedia the Apple Macintosh computers account for approximately 8% of computers. From my survey, 37.6% of respondents use an Apple Mac as their main internet device. I think this might be because many of my peers also use an Apple MacBook for Schooling purposes. Our School uses MacBook Pro’s almost exclusively.

Internet usage graph

Another interesting result is the number of people using Android Phones compared to iPods/iPhones. In New Zealand more people own Android Phones than Apple Phones. So maybe the people who I know are more likely to use Apple devices due to our age group and preference for Apple products. I thought their might have been more iPad users amongst my respondents.

This is bad news for Microsoft, with less than a third of respondents using a Windows PC to access the internet.